

Master Class: Laying out a Coopered Ellipse


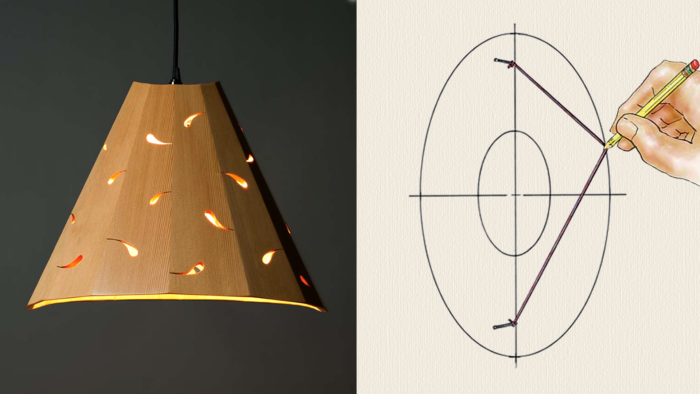
Most of the steps for making an elliptical coopered lampshade are similar to those for making a cone-shaped one (see “Creating Coopered Lampshades”). The big difference is in the layout.
In a cone-shaped shade, all the staves are the same width, and the bevel angles between them are also all the same. To create an elliptical shade, you can either graduate the widths of the staves or adjust their bevel angles. I’ve tried both options and find it simpler to alter the stave widths, keeping bevel angles constant.

To begin the layout, make a full-size elevation drawing of your shade, as you did with the conical shade. On this one, show both the wider front view of the shade and the narrower side view. You’ll transfer information from the elevation drawing to lay out the elliptical openings at the top and bottom of the shade.
Draw the two ellipses using the string method, following the steps in the drawings below. Then divide one of the quadrants of the large ellipse into segments, one for each stave. I made this shade with 16 staves, so each quadrant has four staves. The quadrants are identical, so the shade is made with four sets of these four different staves.


Use a bevel gauge to lay out the segments. Divide 360° by the number of staves (for 16 staves, the resulting angle is 22.5°), and set a bevel gauge to that angle. Use the gauge to determine the length of the segments in one quadrant, as shown in the photos below. Then draw radius lines from the centerpoint of the two ellipses out through the segment marks. These lines represent the joints between the staves. Finally, measure the distance between the radii at the inner ellipse and the outer one to find the widths of the four staves in each quadrant.
Step 1. Use a bevel gauge to divide one quadrant into four segments. To find the gauge angle, divide 360° by the number of staves you’ll use. Here, with 16 staves, it is 22.5°. Lay the gauge on the drawing with its vertex where the major axis crosses the ellipse and with its two legs meeting the ellipse at points equidistant from the major axis.

Step 2. Having marked one of the points where the leg of the gauge crosses the ellipse, move the vertex of the gauge to that mark. Place one leg where the ellipse crosses the major axis, and make a mark where the other leg contacts the ellipse. Be as accurate as possible, and repeat the process if it doesn’t come out exactly right in step 3.

Step 3. Move the gauge once again to find the third segment mark, and then move the vertex to the third mark to verify that the legs are aligned on the second mark and the minor axis, as in the photo below.

Find the bevel angle for the table-saw blade using the app at ferobevel3.netlify.app, entering slope and number of staves. This time, though, you’ll need to average the slopes of the shade’s front view and side view.
Draw radius lines from the intersection of the axes to the segment marks on the outer ellipse.

To find the widths of the staves, measure the distance between the radii at the inner ellipse and the outer one. These measurements together with the length of the side lines in your elevation drawing give you the dimensions of your staves.. You’ll need four staves in each of these four sizes to complete the shade.
-Seth Rolland makes custom furniture and sculpture in Port Townsend, Washington.
| From Fine Woodworking #324
To view the entire article, please click the View PDF button below. |
 |
Sign up for eletters today and get the latest techniques and how-to from Fine Woodworking, plus special offers.
Download FREE PDF
when you enter your email address below.
View PDF